Monday, February 20, 2012

Inside the Hull: Scupper & fiberglass

Begin with the end in mind. Here is a picture of my friend Lou who helped me glass the inside of the canoe today. I'm very please how its looking and can't wait to install the gunnels next. After about 4 hours I'll install the 2nd coat so it makes a strong chemical bond. Two coats should be enough on the inside to give a bit more texture and no slip surface. Now, back to the beginning.

In celebration of President's Day today I worked on the canoe and made great progress. All last week I had been trying to lay out the "scuppers" (3" x 1/4" groves cut in the inner gunnels) in a pattern that would pleasingly give me solid wood for the yoke, thwart and seats. It was quite a challenge and I don't want to tell you how many diagrams I drew. Anyway, I finally transferred my pattern to a cedar batten that was clamped in place where the gunnels will go and it all worked out. I marked the strip and transfered my pattern to the two 3/4"x3/4" ash gunnels. I also invented a jig for my router that would cut exactly a 1/4" x 3" groove with a 1/2" router bit. I'm sure someone else has long ago invented this before me but since I didn't have their plans I considered it my invention.
The ash gunnel slid in a trough where each part to be cut was marked with a center arrow. It worked quite well although using a router is no joke. I purchased a new 1/2" bit but it still splintered the wood in some places. Not sure why.
Since it was nearly 50 degrees in February I set this all up outside. It worked very well except for my few mistakes that I hope you'll never see. :) Here you get a glimplse of some of the completed "scuppers".
Before I did this I got Debra to help me lay out the figerglass cloth in the hull so it had time to settle. I think I used up all of our clothes pins and had to go to clamps to hold it in place. It actually settled in very nicely.
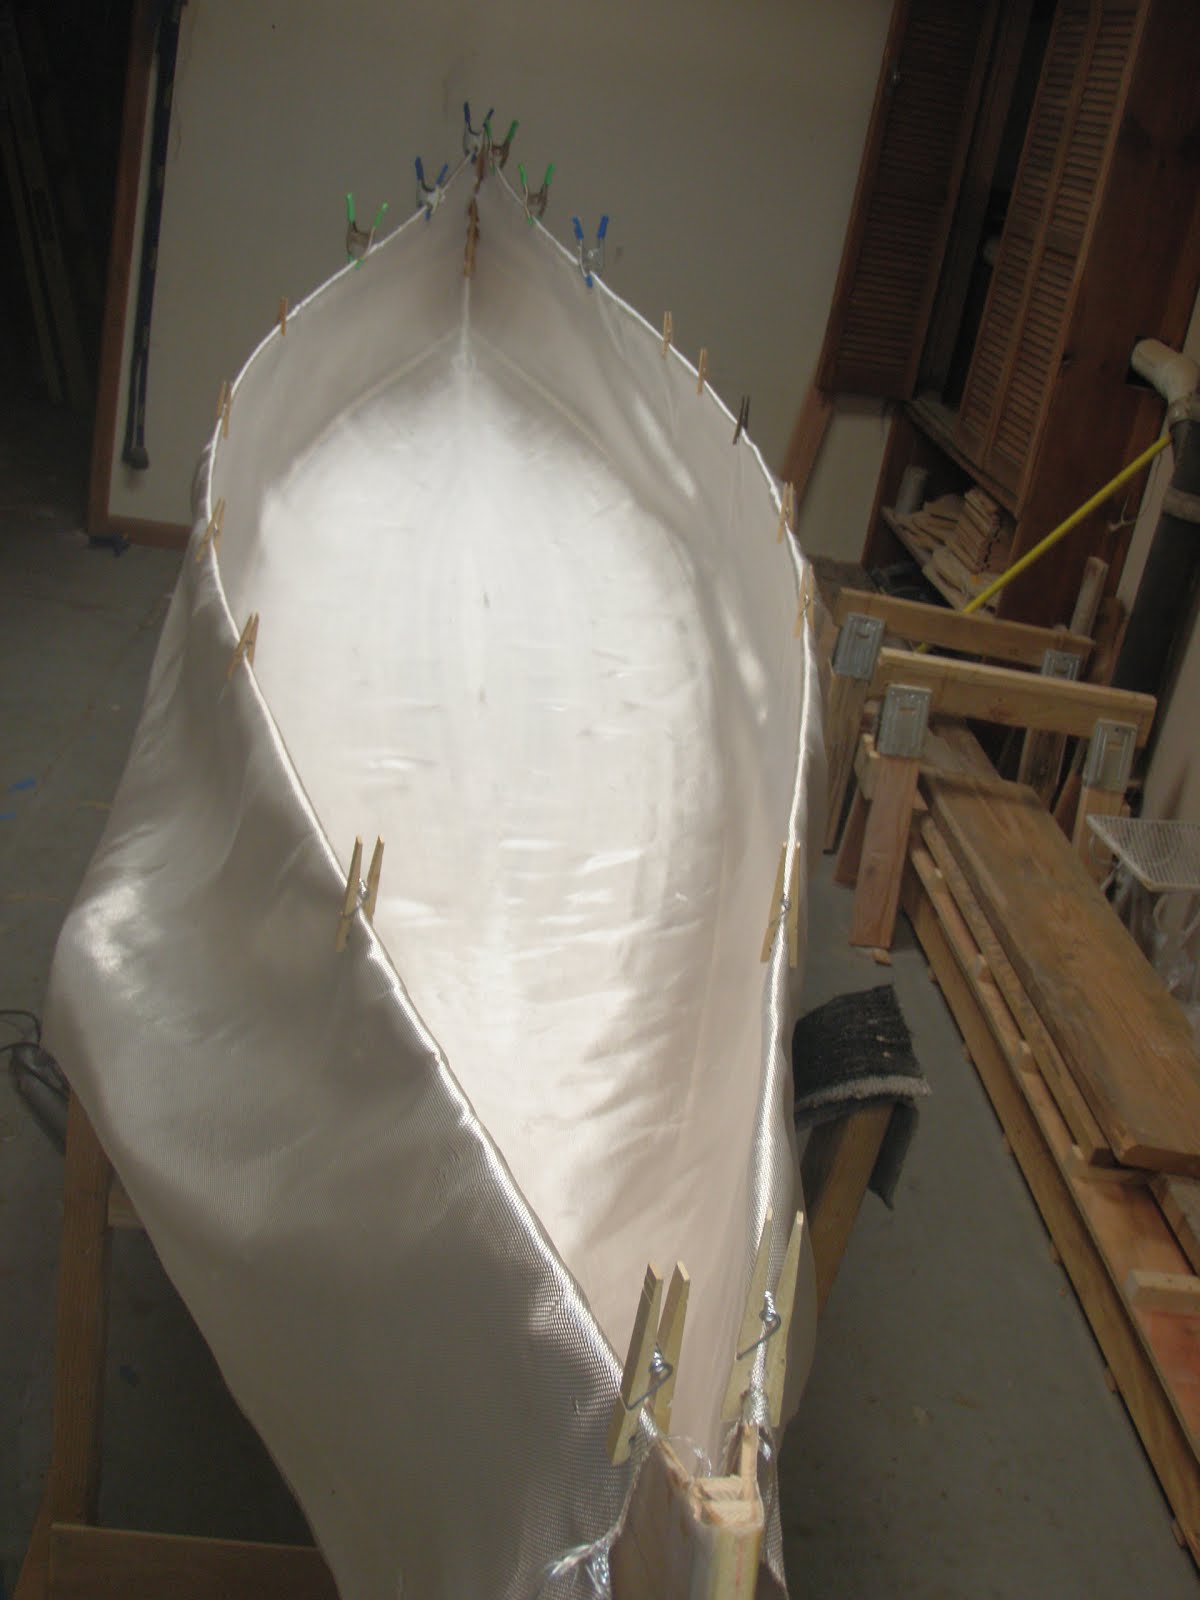
The book recommended leaving 4" at the end rather than trying to wrap the stem in glass cloth. My son Ben confirmed to me that the ends are inherently strong as they are and don't need the extra strength of the cloth. nevertheless, stubborn as I am and wanting the canoe to be as strong as possible I pushed the cloth to as close to the end as I could get it. I now understand why they recommend 4". However I was able to lift the cloth as recommend and lay the epoxy behind it and lay it back down. All in all in laid down well in the corners and extends almost to the stems.
I picked up my friend Lou after his shift in the deli at Shoprite and he mixed epoxy while I installed it. The inside of the hull actually went easier and faster than the outside. I used the squeegee more than the brush in just pulling it up the sides as it filled the weave of the clother.
Here is a picture of the completed first coat and Lou. I'm very please how its looking and can't wait to install the gunnels next. After about 4 hours I'll install the 2nd coat so it makes a strong chemical bond. Two coats should be enough on the inside to give a bit more texture and no slip surface.

Monday, February 13, 2012

Flipping the Hull

Today I did the nasty job of sanding the epoxy on the hull. Since it had 2 days to set and was very hard I figured I could try to "not put off till tomorrow what I could do today". Canoe Craft also recommended that the hull might be more stable if it was still on the stations. After about 3 hours with 80 grit and then 120 grit on the random orbital sander my hands are still vibrating. But, its all done and ready for the varnish later. Looks really good when I rub water on it, which gives a taste of the final finish.
My friend and fellow Cadet Counselor Terry came over to help me flip it off the stations. I left the bow and stern stations in place and took them out later. Came off really well. Terry, who is also been helping in the River of God School of Paddling wanted to know when we can paddle it. Sorry, this ones to raise money for Paterson Habitat for Humanity to continue to build homes here in the city in partnership with families. Now it looking like a canoe. On with the fun of sanding and glassing and sanding again the inside. But I'm starting to plan installing the gunnels. Stay tuned.

Saturday, February 11, 2012

Glassing the Hull

Well, after much sanding and more sanding and more sanding and then a whole lot of sweeping and vacuming and more vacuming I finally was ready to glass the hull. This is really a "no turning back" experience so I wanted to be sure everything was ready. Thursda evening I did a final cleaning of the hull and Friday morning my friend Lou and I draped the cloth over the hull. Friday evening at 5 p.m. we began with Lou mixing epoxy while I brushed it into the cloth.
I'm using MAS again because I found it very easy to work with and was pleased with the outcome. Here is Lous mixing while I installed it. The first coat takes alot. It took us from 5 - 8 to install the first coat and another hour for me to finish finishing it.Its best to do all the coats within a 10 hour timeframe so tha the chemical bond of the epoxy gets really strong between coats I began the second coat at 11 p.m. and finished at 1 am. I did the final 3rd coat at 10 am. Saturday morning. I'm very please with the patterns and the finish.
Next step is to flip it over and do it all again on the inside. Fun!

Friday, February 3, 2012

The Hull is planked!

Its been awhile since I've blogged but I've been steadly working on the canoe and making good progress. Filling in the bottom gets challenging with exact miters required on each end to the perfect length. I really took my time and each piece went in well. I used straps to clamp them down as well as screwed blocks and clamps.

Here is a picture with the sheet strip cut to the angle of the finish. I clamped a thin strip left from the kayak along the sheer line, traced the line and cut it with a saber saw. Its still a bit rough but is not the final edge yet. Its really starting to look like a canoe now.

Setting the outer stems is also a delacate and exact process. With a very sharp chisel I cut the notch where the outer stem rests on the inner stem. It seemed confusing reading the instructions in Canoe Craft but as I proceeded it made sense. Once the notch is cut and the stem fits securely I drilled holes in the stem through which #6, 1 1/4 screws would easily slide. Then I drilled a smaller hole where they will grip into the inner stem. The instructions warned against tightening the screws to much to snap off the heads and still I snapped two. Then I set the torque lower on the drill and did fine. When all fit perfect I mixed up a batch of epoxy and brushed it over the inner stem wood 4 times to let it really sink in. Then I thicked the epoxy with silica and sanding dust, gobbed it on and screwed it down. (with waxed screws). The extra epoxy oozed out as it was supposed to and fille all the gaps. WOW - it all really worked. :)

This is now getting planed down to the perfect angle and then sanded. Setting the final strip was a real challenge. The instructions recommended glueing the last two pieces together with the curve matching the curve of the last strip. I figured out a way to do this right over the last strip. They I measured about 10 times, cut once, reglued the cut on and cut again to get the final sliver of a strip that fit just perfect.


Here it is! The finished hull. I'm very pleased how i looks and some of the contast stips should look really good once finished. Next step is planing and sanding the entire hull before fiberglass.

Sunday, January 8, 2012

More Planking

It's been awhile since I've worked on the canoe with our kids and grandkids here and then being away for a prayer retreat. But, I'm back at it. The planking is up to the top of the stems and I'm finding many creative ways of stapleless methods to keep them in place. The wooden blocks recommending in Canoecraft work really well so I cut enough of them. Below are some of the methods I'm using.

This is the standard method of the wooden jig, C clamp and shim to hold things in place. It works really well. As you can see above I've also used alot of squeese clamps which go down even easier.

When there isn't enough room for a clamp anymore a little piece of wood screwed to the station also works well. Again, the shim keeps the strip in place and tight.


At the stems you have to get a little more creative. I've actually used staples to hold some of the ends to the inner stem. In addition I'm using straps to cinch down on a woodblock and hold the strip tight to the glue on the stem.


Now that I'm at the top of the stem I will continue by just stipping out one side untile every strip on this side is past the centerline. Then I will stretch a stringline down the center of the hull and make a straight mark and cut. The second side will be stripped with each piece mitered to fit.

Stay tuned.


Saturday, December 17, 2011

Planking

I've been making good progress planking the hull and pleased how it is coming out. I've been using a variety of techniques to install the strips without staples. Here you can see that I'm planing up the hull toward the bottom and the top at the same time. I shave the stem as I go to match the angle to each strip as it is installed.

Here is a jig that was recommended by Ted Moores in Canoecraft & Kayakcraft. Its basically a 31/2 x 51/2 piece of plywood with a 3/4 inch notch cut out. It can handle 3 strips at a time but I'm only using one. I'm using it to put pressure on the temporary short cedar strip that I have stapled in above the strip being installed. It also provides pressure, along with a shim, on keeping the strip close to the station. It works very well.

Here's an overview picture of the canoe as it takes shape. I'm finding my way with the shades of cedar to create a pattern. Hopefully it looks good. It takes me about 2 hours to prepare and install 4 strips on the top and bottom. I find it very relaxing and rewarding.

Here is a little video to give you a look around the canoe.


Monday, December 5, 2011

Stems, Sheer & Strips

Shaping the stems is definitely, as someone put it " a bugger of a job". I used a small block plane, spokeshave and surform to begin the shaping. I also used a caliper to maintain a 1/8" edge.
My father came by this morning with Mr. John DeVries - a Master Carpenter as well as choir director - from the Holland Home to give me some lessons in using a spokeshave & plane. The big lesson was to keep them sharp. While I considered frequent sharpeing once a year or so Mr. DeVries informed me that I might have to shapen it every few hours - especially since there was epoxy in the stems. I purchased a Stanley sharpening kit and now know how to do it. Another lesson learned. I was also trying to shave way to much at one time. The key it to just get a little slice.
Setting the sheer strip is one of the most important steps in building. Beginning with the center station it runs outward parallel to the water line. When I did the kayak I put the bead side up but with this I put the cove up. This makes it much easier to lay in the glue. The sheer must be "fair". This means that it follows as gentle line without being forced out of shape.

Once the first sheer strip is put in place the second one needs to match it. The way to do this is by leveling across between each station. This is another reason why it was so important to get the strongback level every which way. It all went quite well and I was excited to get started installing the strips after all the preparation work.

Now I have to decide what pattern I will create in this canoe. I have a variety of shades of red cedar from quite light to fairly dark. I wish I had a few strips of Alaskian White Cedar or or Black Walnet but I'm not confident enough to cut and route my own so I'll work with what I have.

Noah's ships their cedar strips with each board that was cut wrapped together in 7 strips. I have 9 bundles of 7 strips so as I unwrapped them I labeled each with a number from 1 -9. This will enable me to put strips on opposite sides and create a balance. I'm still trying to figure out what kind of a pattern I will create. Wait and see.

I have chosen to build this canoe without staples in the strips. When I built the "Spring Run" I used staples in the hull and did the deck withouth. It takes a bit more time but I find its well worth it to avoid all those staple holes. There are several different methods to go "stapleless" depending on how fast you want to work. Since I usually only do one strip at a time on each side I have developed my own method. I have a load of 3" strips that are beaded & unbeaded. As I install the cedar strip I install a short piece above it and staple that. Then I use masking tape to pull all the strips tight together and put two unbeaded strips on each side of what was glued with a squeez clamp to hold it fast. I find that each strip takes me about 30 minutes which is fine with me. So, I actually am using staples but not putting them in the strips of the canoe.

Here are the first 3 stripss installed. You can see the little glue syringe that they sent with the kit. One fill with glue does about 1 strip on 1 side. It really works great. In order to keep the strips parallel to the waterline I will also be installing strips in the bow and stern on the bottom (or top depending how you look at it) of the sheer to fill in that section. Its very exciting to see the canoe taking shape. At this rate I don't think I'll have any trouble finishing it to auction off atPaterson Habitat's annual dinner in April